DMDS API REST v1.5 Documentation using Postman

In all examples, replace XXXXXXXXXXX with the name of the dedicated DMDS, and APIKEY or Authorization with the secret hash.

Example:

../_images/api1.5.png

Download Postman for Windows

https://www.postman.com/downloads/

Changes from v1.4 to v1.5: number of events and paginated events

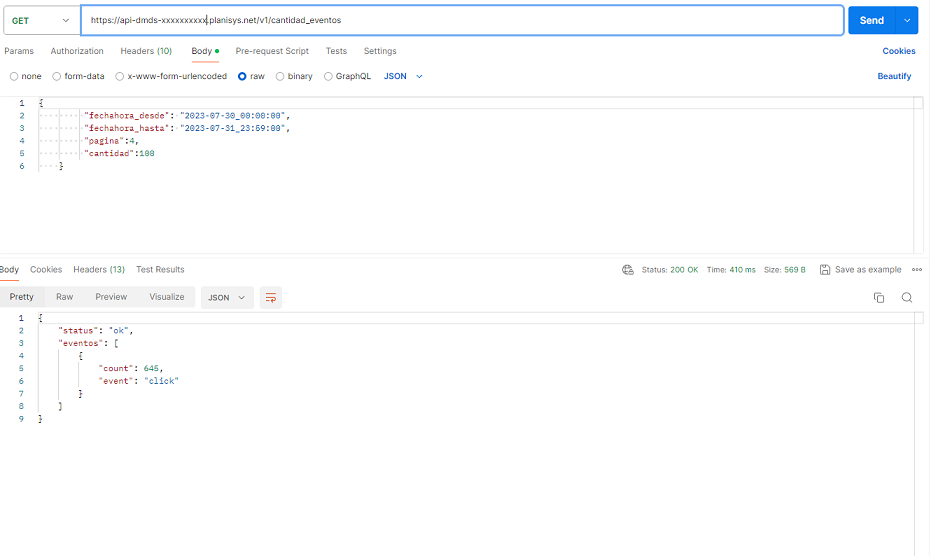
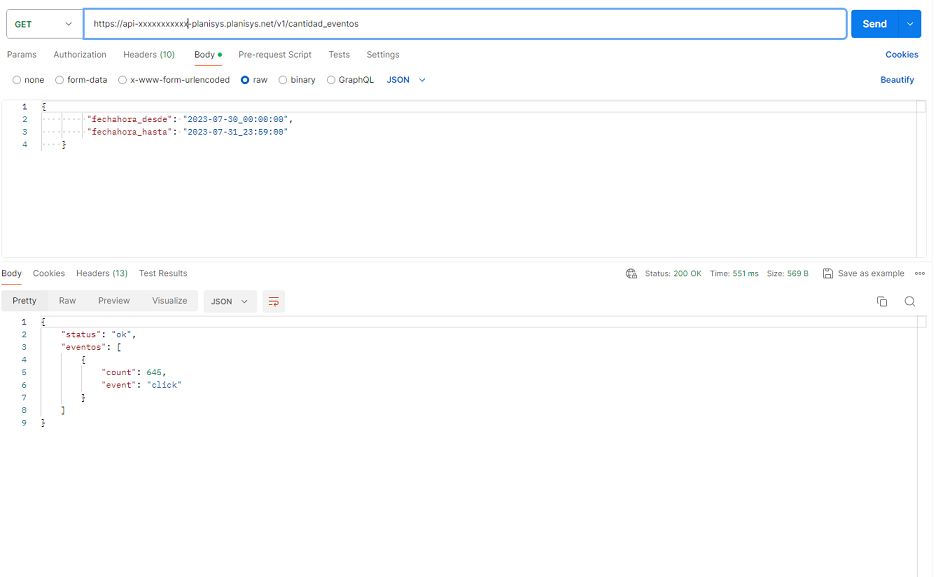
The method cantidad_eventos is added to obtain the number of events between two specific dates.

Number of Events between Dates

Example:

../_images/api2.png

Events between dates with pagination

This method ver_eventos allows pagination with a variable page length greater than or equal to 10 and to select from a page the events that occurred between two specific date-times. It takes four parameters:

Example:

../_images/api3.png

Warning

The pagina and cantidad parameters within the JSON must be numeric.

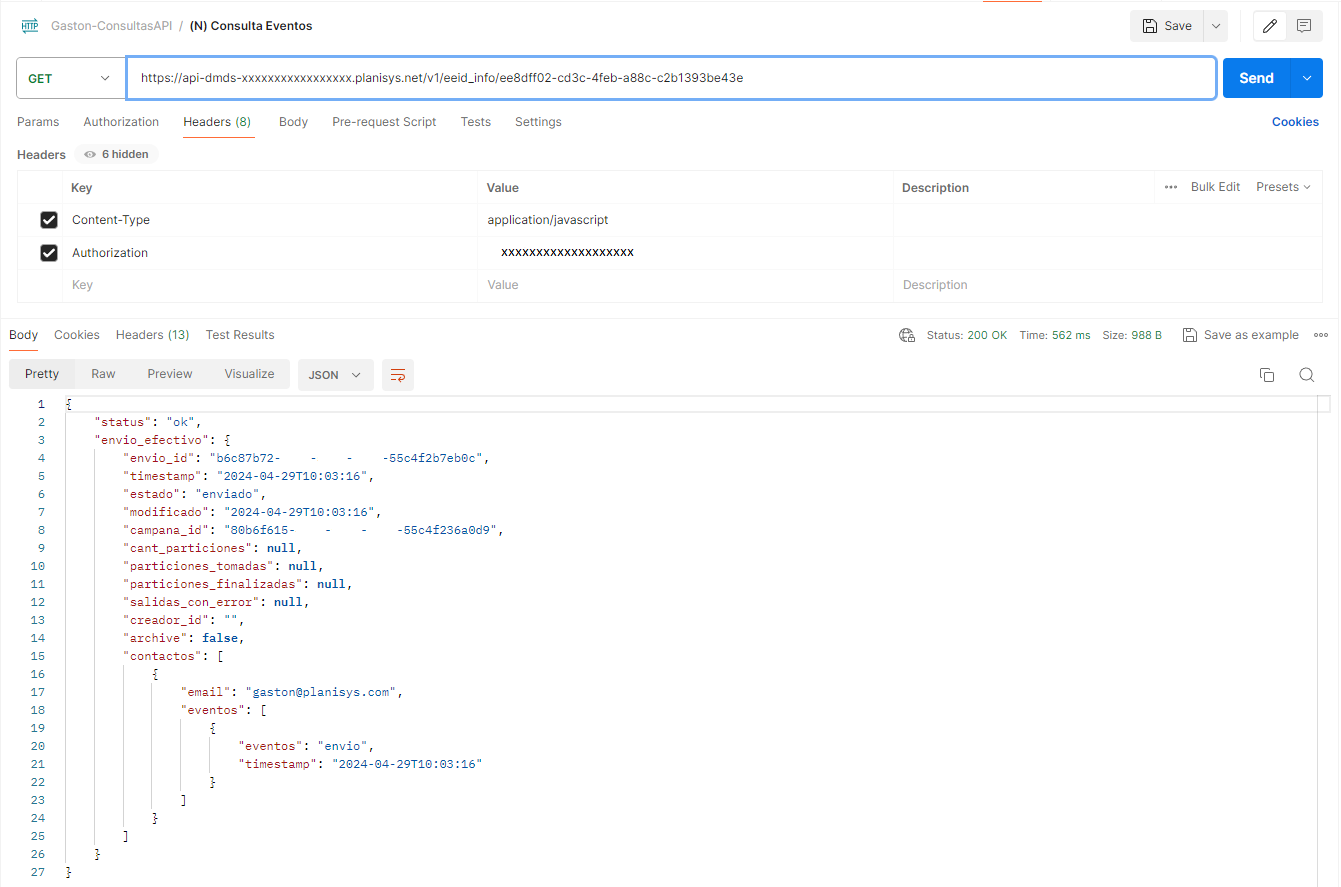
Event Query

The response to sending emails may contain a 4xx code, for which the user must analyze the error (e.g., missing a parameter).

If a send works correctly, the response is usually a JSON with these 3 pairs:

{"status":"ok", "sent":4, "eeid":"3abc993d-8i88-45e8-a6c9-e879378abba5"}

El uuid que se devuelve como eeid (envio_efectivo_id) puede ser consultado posteriormente con un GET. El número que sigue a sent es la cantidad de mails enviados durante la llamada, p.ej. un destinatario con 3 copias.

Warning

Importante: si se quiere agrupar envíos subsiguientes en un mismo lote, se puede agregar la opción reuse_eeid: True , y se deberá agregar eeid: …. de manera de poder reusar un eeid anterior y agrupar envíos en un mismo lote o batch.
../_images/api33.png

Other events may appear such as rebote-soft , rebote-hard, click or view

Warning

Starting from v1.4, if the effective send was done with archive:true, the JSON returns a section called archive with the trace information of the effective send made.

Changes from v1.3 to v1.4: archiving of sent emails (requires archiving license)

The flag “archive” is added in send_many_inline and send_one_inline, with the objective of saving a record of what was sent within an Effective Send (also referred to as Batch).

By setting “archive”:”true” in the parameter list of the aforementioned methods, more information can be retrieved with the eeid_info method (see below), and the EML formats sent to each recipient can be retrieved.

Additionally, for archived emails, the eeid_eml method is added, which allows the return of the email text sent in an effective send to one of the recipients.

This way, a copy of the EML actually instantiated for each particular recipient can be kept, containing, for example, receipts, notifications, or invoices for Audit purposes. This functionality requires *L$

Changes from v1.2 to v1.3 - Whitelisting

The “whitelist” method is added, which allows checking if a contact is on the whitelist, and adding or removing them from it.

The whitelist serves to immunize a contact so that they are not invalidated by a possible bounce due to a failure or confusing message from the receiving MTA.

It also protects them from a possible unsubscribe/invalidation process that could be done based on bounce processing.

Changes from v1.1 to v1.2 - API version

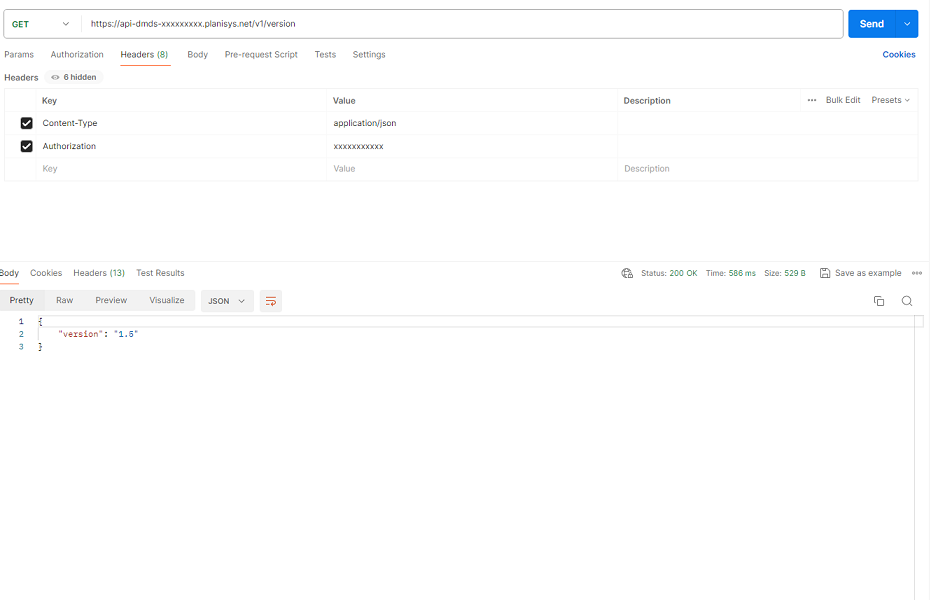
The “version” method is added, which returns the API version number, for example.

Get API Version

With this call to the “version” method, the API version being used can be obtained, and changes in the documentation can be looked up.

../_images/api4.png

Changes from v1.0 to v1.1 - Revalidate and Invalidate

The “revalidate” and “invalidate” methods are added, and Revalidation and Invalidation events are saved to track contact status changes.

The Not-Sent event is also added for cases where an email is attempted to be sent to an invalid contact. This event is displayed in this version as unknown in the API, and as Not-Sent in the Mtmail web interface.

Event viewing is compatible with the https://mtmail.planisys.net application, which will replace the dmds-xxxxxxxxxxx.planisys.net applications soon.

Contact Whitelist

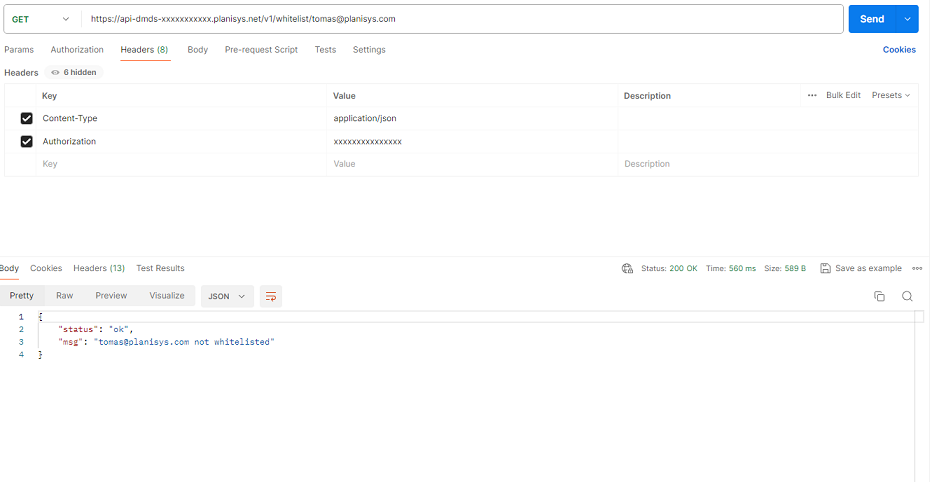
The “whitelist” method can be used to check if an email is on the whitelist using GET, remove it from the whitelist using DELETE, and add it to the whitelist using POST or PUT.

Check if it is on the whitelist with GET:
../_images/api6.png

returns if not on the whitelist:

{"status":"ok","msg":"usuario@dominio.com not whitelisted"}

and returns if it is on the whitelist:

{"status":"ok","msg":"usuario@dominio.com whitelisted"}

Add to the whitelist with POST or PUT:
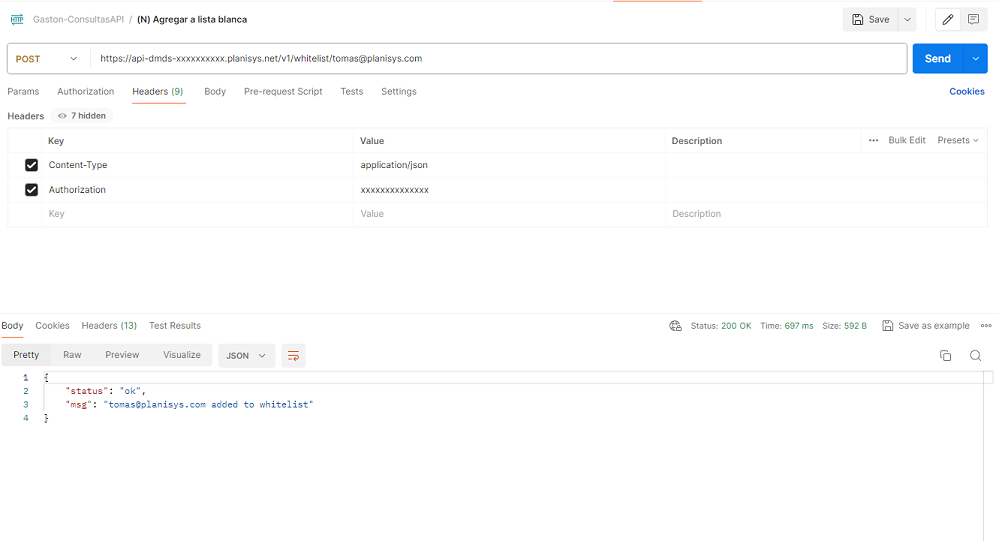
../_images/api7.png

Remove from the whitelist with DELETE
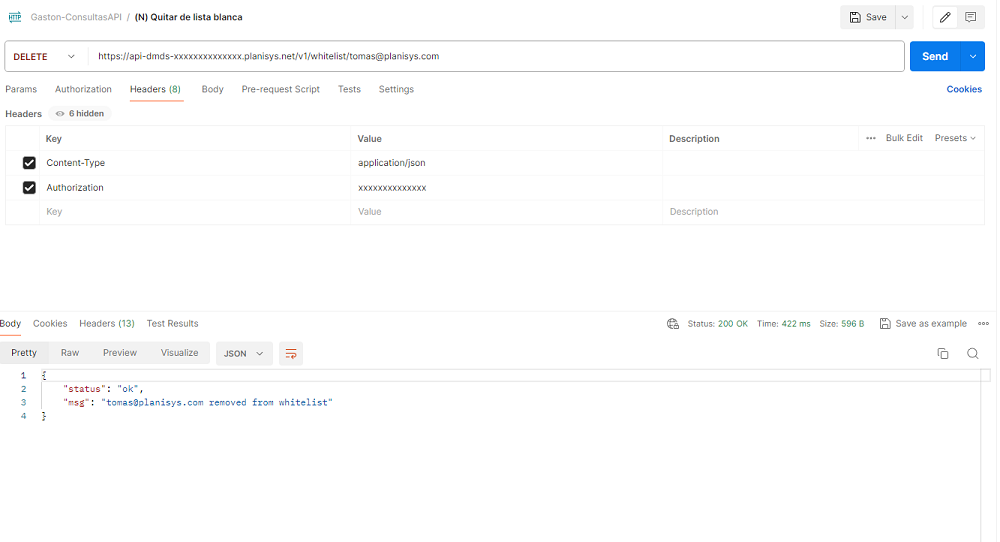
../_images/api8.png

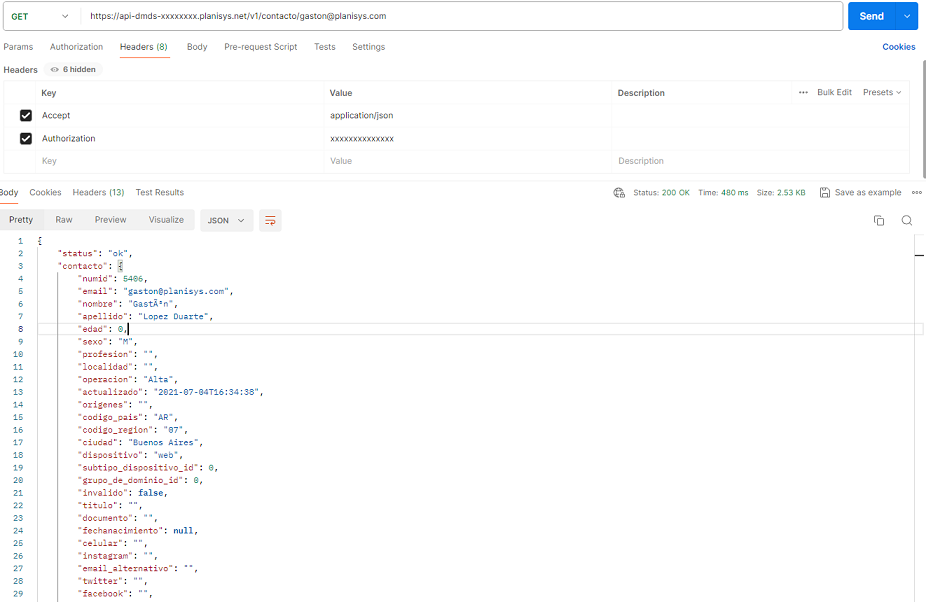
Return contact information

In this example, it shows how to return the information of a specific contact. In the call, in the URL, the email of the user already existing in the API database must be specified. This way, all the information of a contact will be presented, such as their name, surname, which Base or group they belong to, their events, etc.

../_images/api5.png

La respuesta viene en un JSON que contiene los eventos, bases/grupos a los que pertenece, campos e información estática. En este caso , se muestra una cuenta de mail que ha sido invalidada luego de dos rebotes “hard”, o cuenta inexistente

{
    "status": "ok",
    "contacto": {
        "numid": 455895,
        "email": "fdkslafjkdsjafdjsakjfdsa@hotmail.com",
        "nombre": "Juan",
        "apellido": "Pérez",
        "edad": null,
        "sexo": "M",
        "profesion": "",
        "localidad": "",
        "operacion": "Modificacion",
        "actualizado": "2020-10-15T08:25:32",
        "origenes": "",
        "codigo_pais": "",
        "codigo_region": "",
        "ciudad": "",
        "dispositivo": "web",
        "subtipo_dispositivo_id": null,
        "grupo_de_dominio_id": 0,
        "invalido": true,
        "campos": [
            {
                "nombre": "XYZDNIXYZ",
                "valor": "21232421"
            },
            {
                "nombre": "XYZEMPLEADORXYZ",
                "valor": "Planisys"
            },
            {
                "nombre": "XYZEMPLEADOR2XYZ",
                "valor": "AvasCloud"
            },
            {
                "nombre": "XYZTELCELXYZ",
                "valor": "+34999111333"
            }
        ],
        "eventos": [
          {
            "evento": "envio",
            "timestamp": "2020-10-15T08:25:11",
            "campania": "VIMS "
          },
          {
            "evento": "envio",
            "timestamp": "2020-10-15T08:25:16",
            "campania": "VIMS "
          },
          {
            "evento": "envio",
            "timestamp": "2020-10-15T08:25:18",
            "campania": "VIMS "
          },
          {
            "evento": "envio",
            "timestamp": "2020-10-15T08:25:29",
            "campania": "VIMS "
          },
          {
            "evento": "rebote_hard",
            "timestamp": "2020-10-15T08:25:32",
            "campania": "VIMS "
          },
          {
            "evento": "rebote_hard",
            "timestamp": "2020-10-15T08:30:08",
            "campania": "VIMS "
          }
        ],
        "grupos": [
            "Origen API"
        ],
        "campanias": [],
        "campanias_desusc": []
    }
}

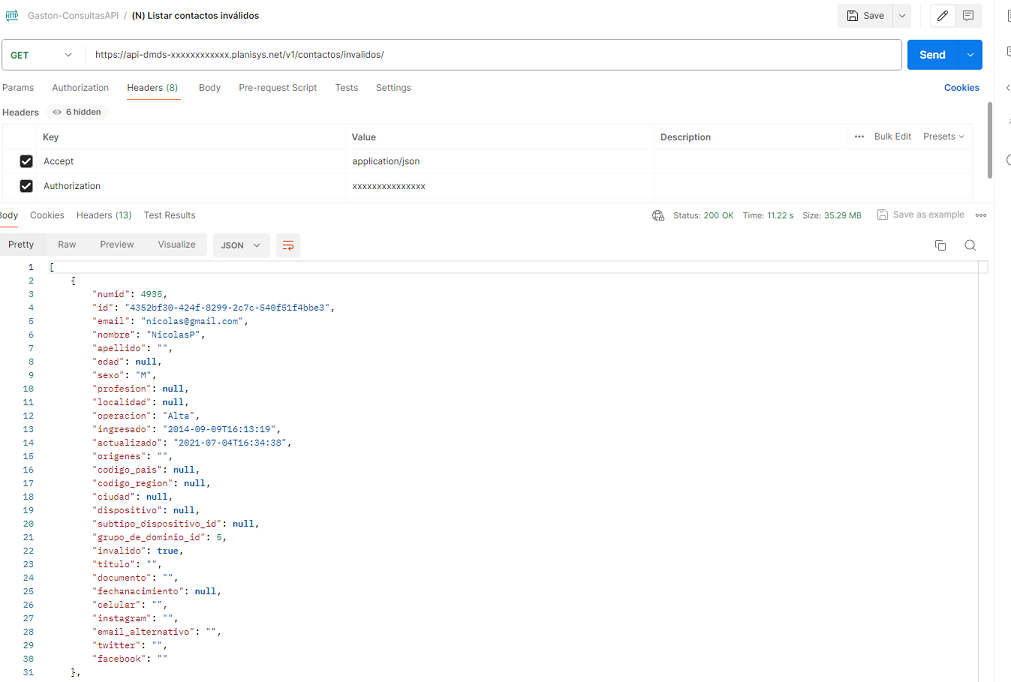
List invalid contacts

This call will show all contacts that are invalid (i.e., due to bounces or Spam Feedback loops, they have been invalidated).

../_images/api14.png

Create or update a contact

With the following call, a contact can be created anew or an existing one updated.

The first variable defined is the email address, which acts like a primary key in the database. Whenever we update a contact, we will base it on their email, as it is unique.

In the data section, we define different attributes that can define a contact. All these fields can be changed as the contact changes any of the values. To specify which user we want to modify, we will use their email.

Associate one or more bases with a new or existing contact
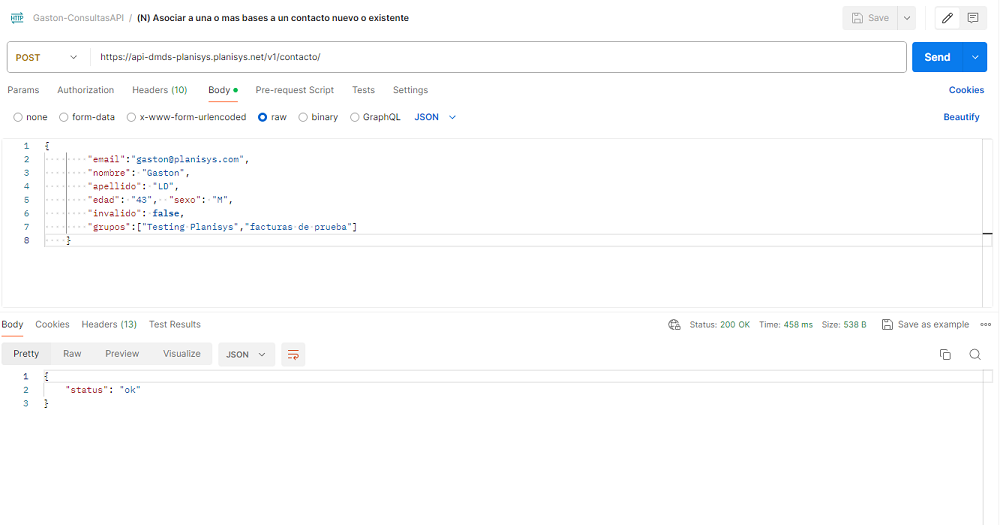
../_images/api10.png

Note

A source or base is the same as a group. It is the name of a contact base. A contact can be part of several bases (groups).

Set field values for a new or existing contact
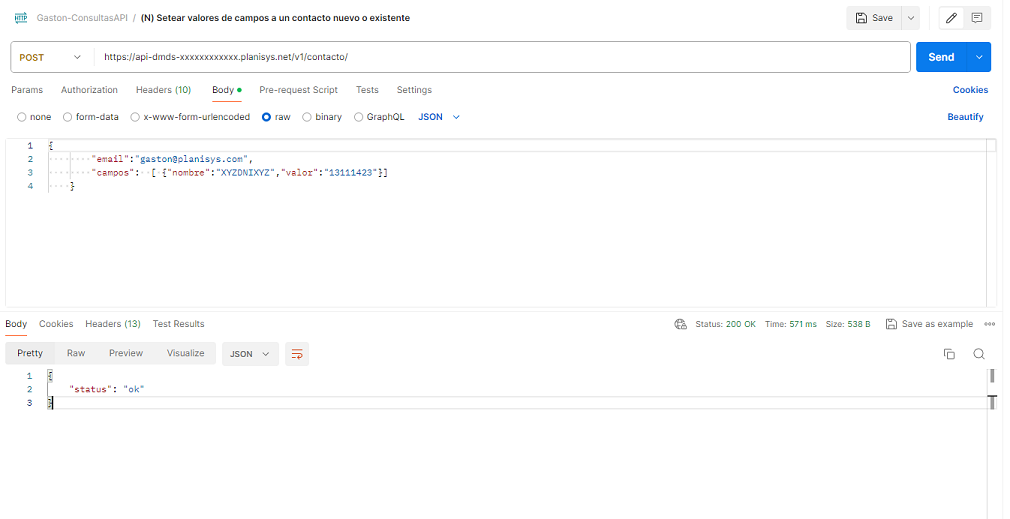
../_images/api11.png

Invalidate a contact (introduced in v1.1)
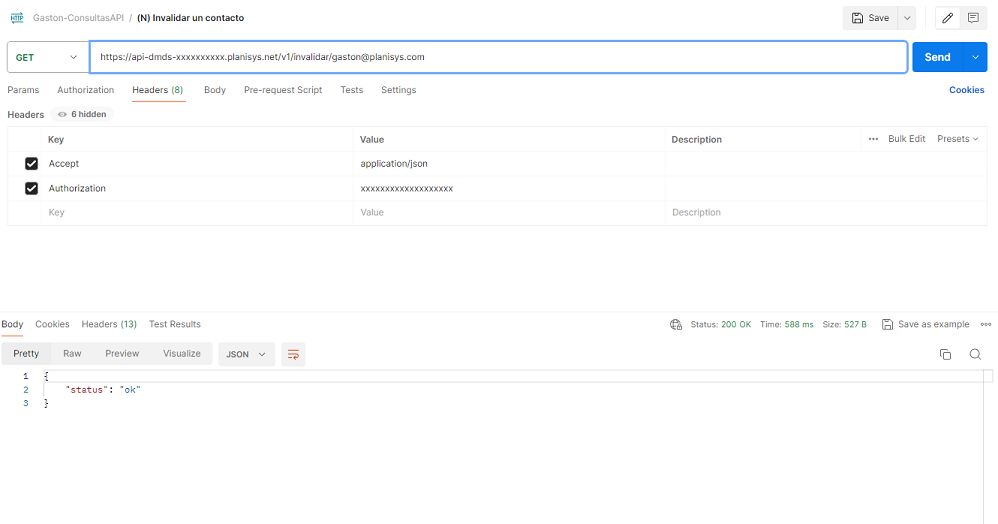
../_images/api12.png

An Invalidation Event will be inserted with the timestamp when the invalidation occurred. When the contact is marked as invalid, any attempt to send them an email directly or as a copy will trigger a Not-Sent (not sent) event.

Note

This is a GET call

In v1.3, with the addition of whitelisting, the response to the call may change, indicating that it is not possible to invalidate a contact on the whitelist; first, it must be removed from the whitelist, and the event will not be added:

{"status":"ok","msg":"whitelisted"}

Revalidate a contact (introduced in v1.1)
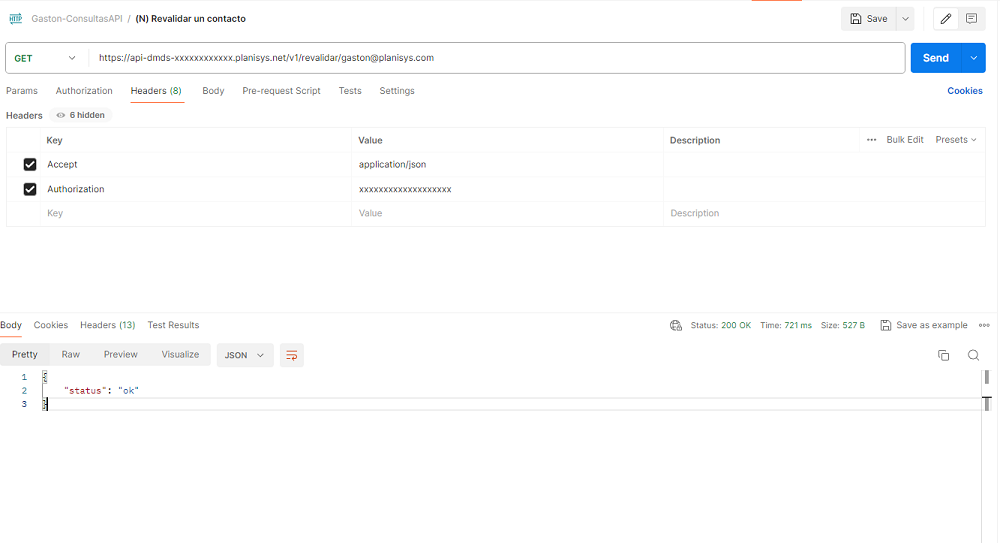
../_images/api13.png

A Revalidation Event will be inserted with the timestamp when the revalidation occurred. If the contact was valid, it remains valid. If it was invalidated, it will be revalidated from now on.

Note

This is a GET call

Similarly to invalidate, in revalidate a Revalidation event will not be inserted if the email is on the whitelist, and it will return:

{"status":"ok","msg":"whitelisted"}

Send an email to a single recipient with html uri

To carry out this send, it is necessary to define some fields, for example: the email field must always be true, as this allows us to send the email. If this value is false, messages cannot be sent. Others$

In the headers section, remember to define your authorization value.
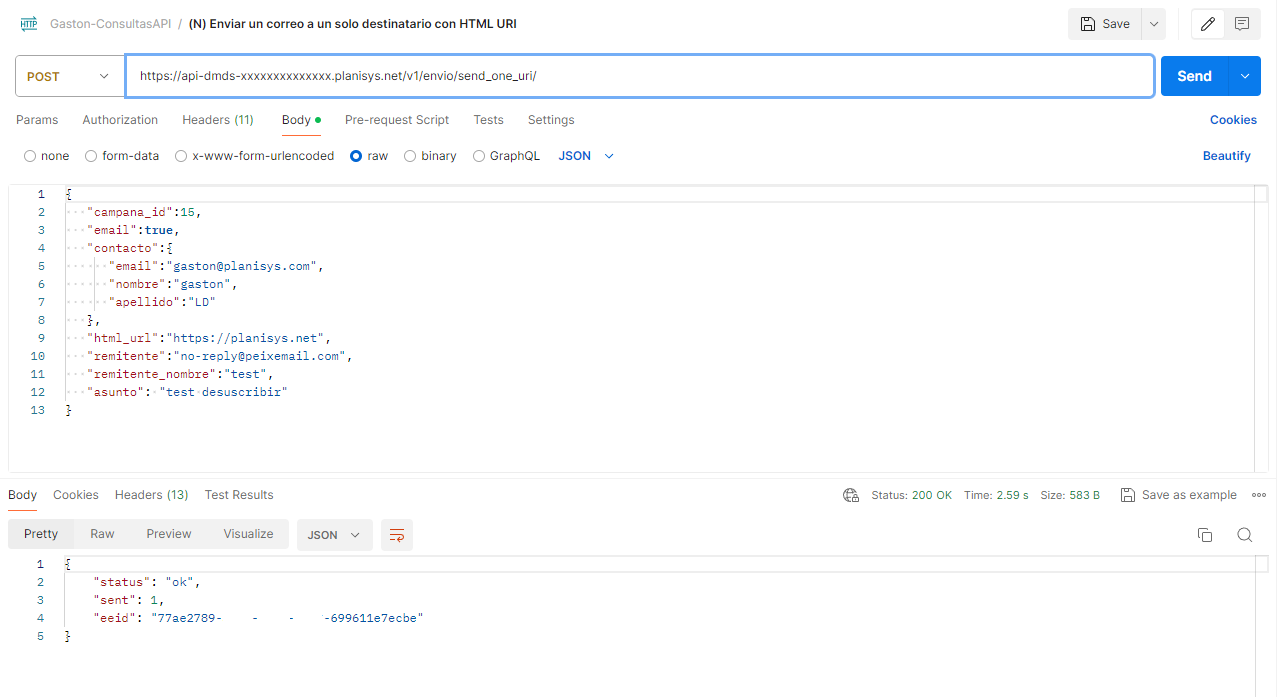
../_images/api244.png

This call will return an eeid (Effective Send ID), through which we can check the events that occurred (see Event Query).

When specifying a URL, the REST API follows the 301 and 302 codes for redirection until it reaches a 200 code and gets the page.

The HTML file is expected to be in UTF-8 encoding or charset, so if the HTML contains mixed characters from windows-1252 or iso-8859-1, for example, some of the content may not display correctly.

In case of doubts regarding the encoding of certain characters or multi-platform handling that mixes various encodings in a single HTML, we recommend using standard international HTML character encodings on this page.

Send an email to a single recipient with inline html
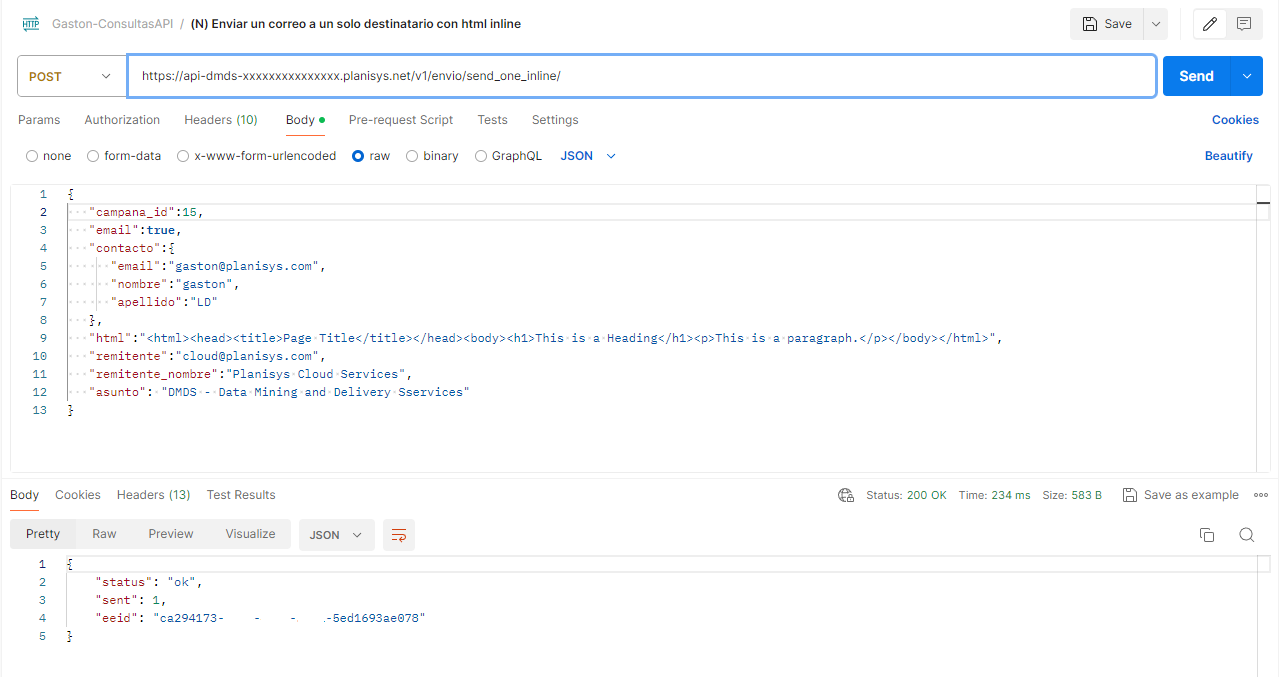
The difference from the previous call is how to define the HTML within the code.

../_images/api25.png

This call will return an eeid (Effective Send ID), through which we can check the events that occurred (see Event Query).

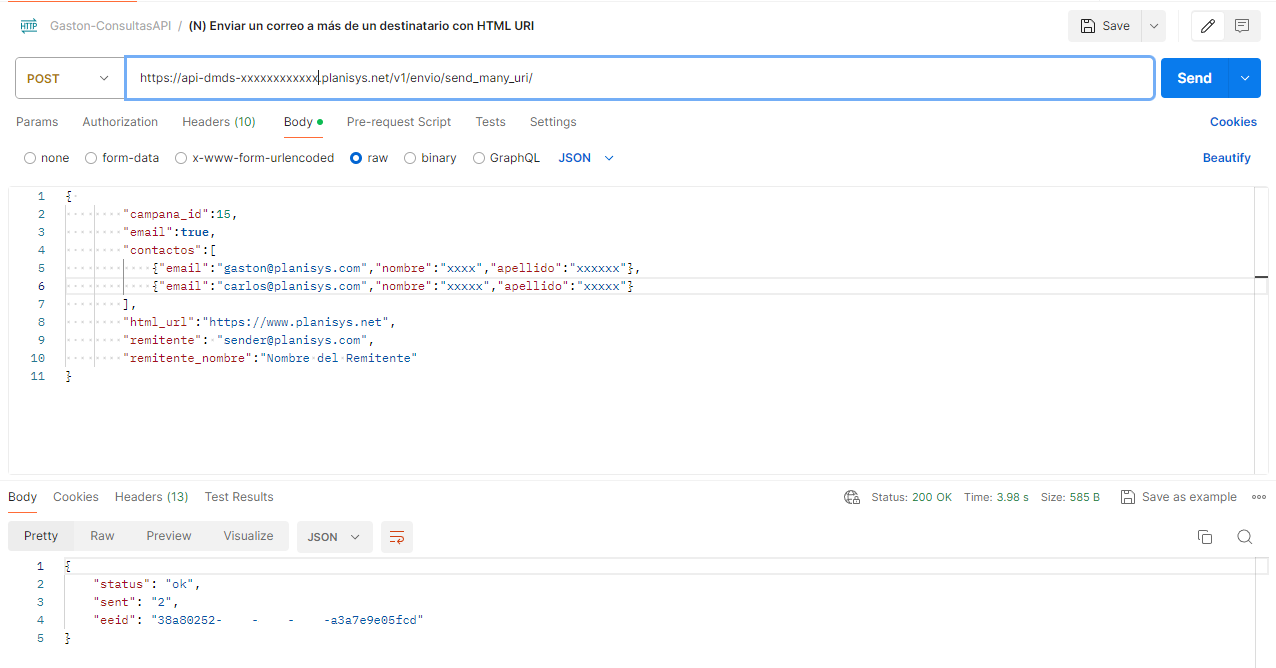
Send an email to multiple recipients with html uri

For this call, we will follow the same concept as the others when sending a message. In this case, we want to send to many recipients, so we will define an array of contacts to whom we want to send and change contact to contacts. In the example shown below, we send an email to two people, but many more can be defined.

Warning

When sending to multiple recipients, contact (a JSON with email, and optionally name and surname) is changed to contacts which is a LIST of JSONs and is enclosed in square brackets [ and ]

../_images/api26.png

This call will return an eeid (Effective Send ID), through which we can check the events that occurred (see Event Query).

Warning

As some email addresses may be incorrect, the number of emails sent shown in the JSON response under sent may be less than the number of specified recipients.

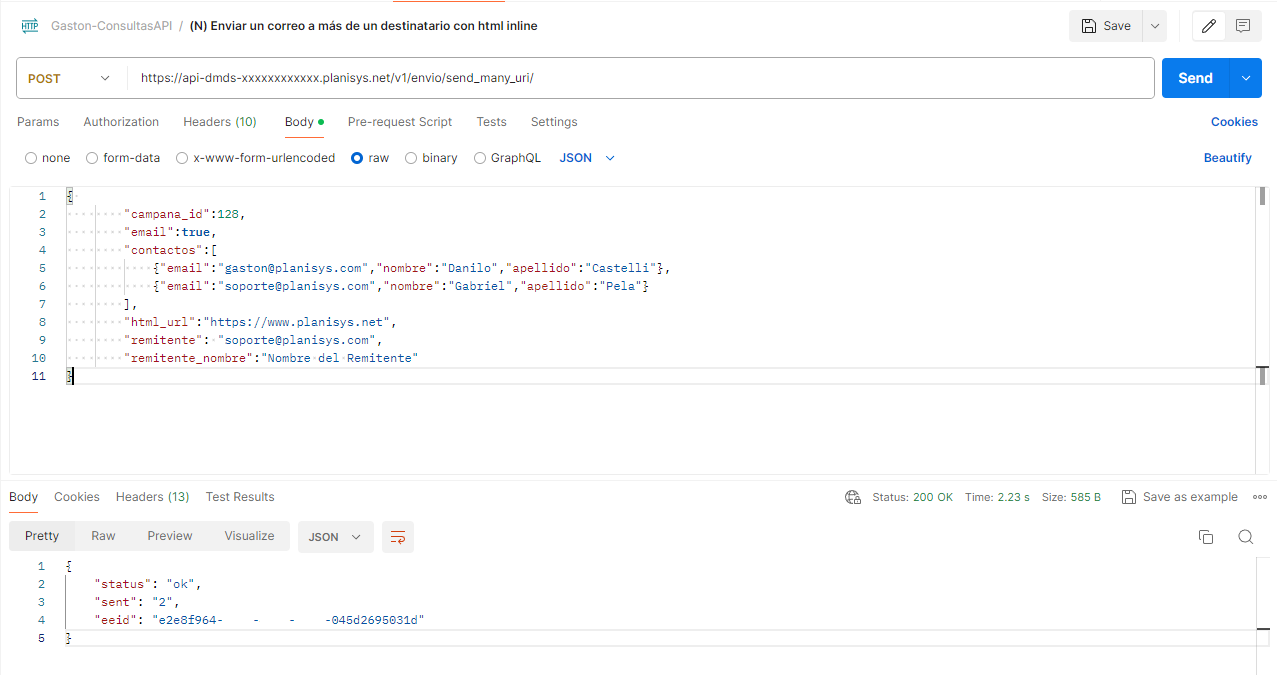
Send an email to more than one recipient with inline html

../_images/api27.png

This call will return an eeid (Effective Send ID), through which we can check the events that occurred (see Event Query).

Campaign APIKEYs

With the campania_apikey method, a numid can be specified with HTTP method GET to obtain the APIKEY of the campaign if one is assigned and it is of the API type.

In turn, an APIKEY can be set with the POST method and the argument “apikey”.

This way, in SMTP-API, a user can be used, e.g., dmdsid-12345 and key the value of apikey.

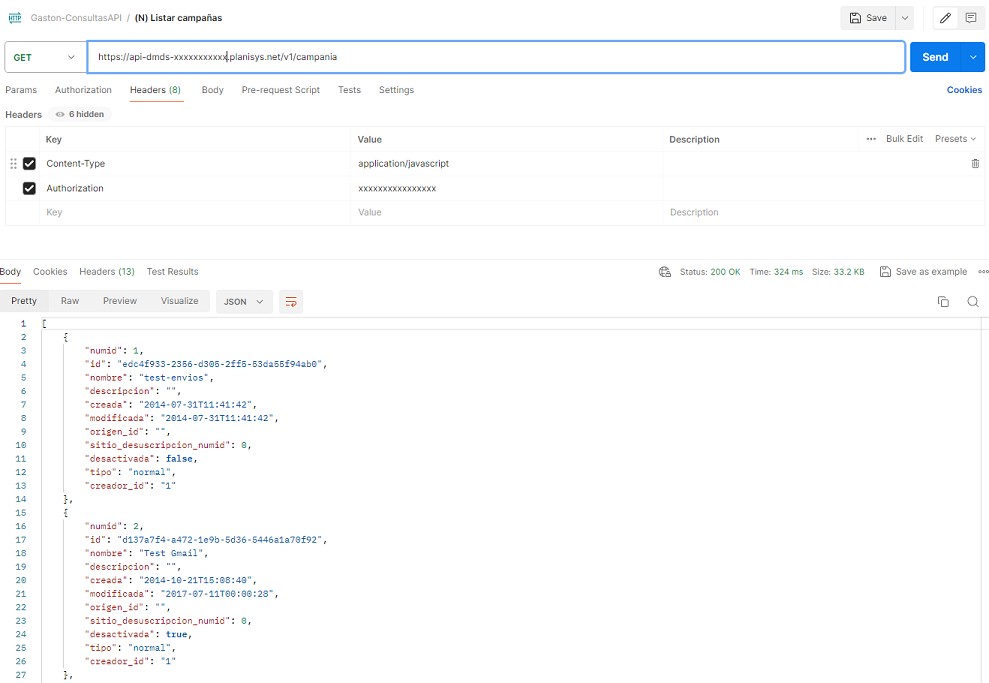
List campaigns

With the same structure, as listing invalid contacts or listing global variables, we can list all existing campaigns. For this, the GET method is used.

../_images/api16.png

It can also be filtered to list only api, normal or bulk type campaigns

curl -X GET "https://api-dmds-host/v1/campania/" -H "accept: application/json" -H 'Authorization: xxxxxxxx' -d '{"tipo":"api"}'

Another filter that can be applied is to list only one campaign by its numid when you want to see a specific one:

curl -X GET "https://api-dmds-host/v1/campania/" -H "accept: application/json" -H 'Authorization: xxxxxxxx' -d '{"tipo":"api", "numid":1234}'

Warning

This call does not list the APIKEYs of campaigns; for that, the campania_apikey method is used.

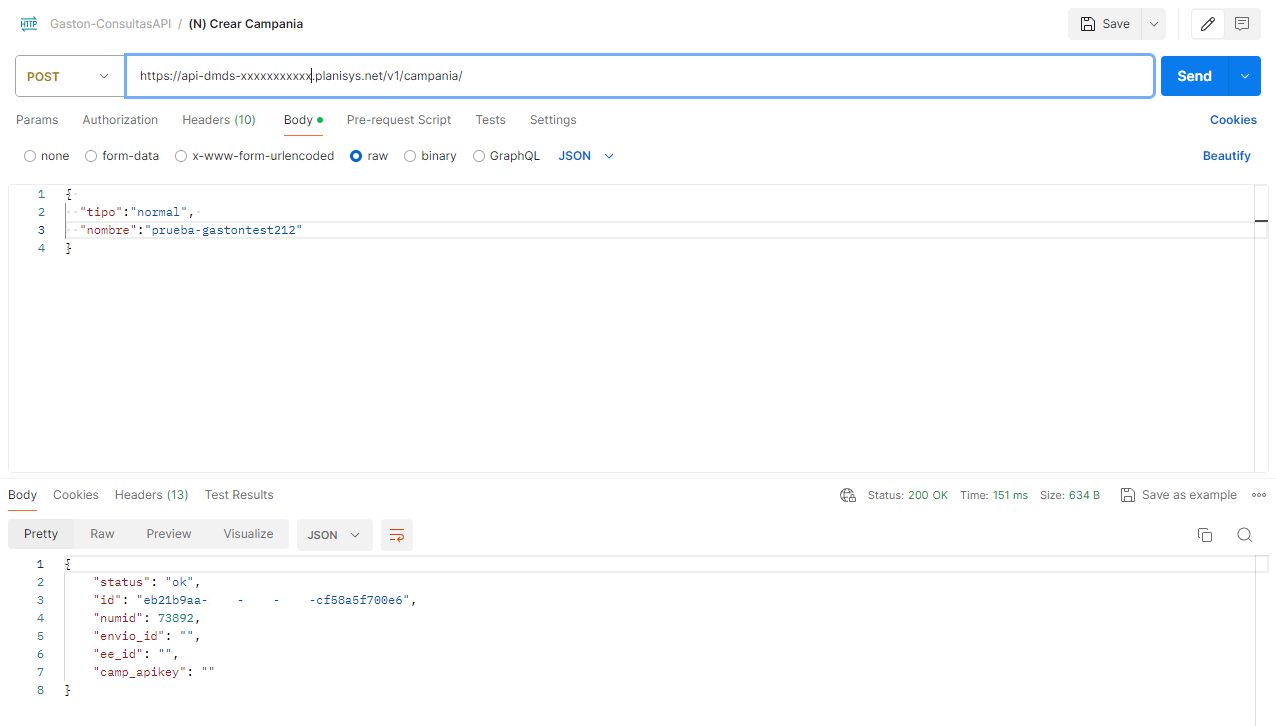
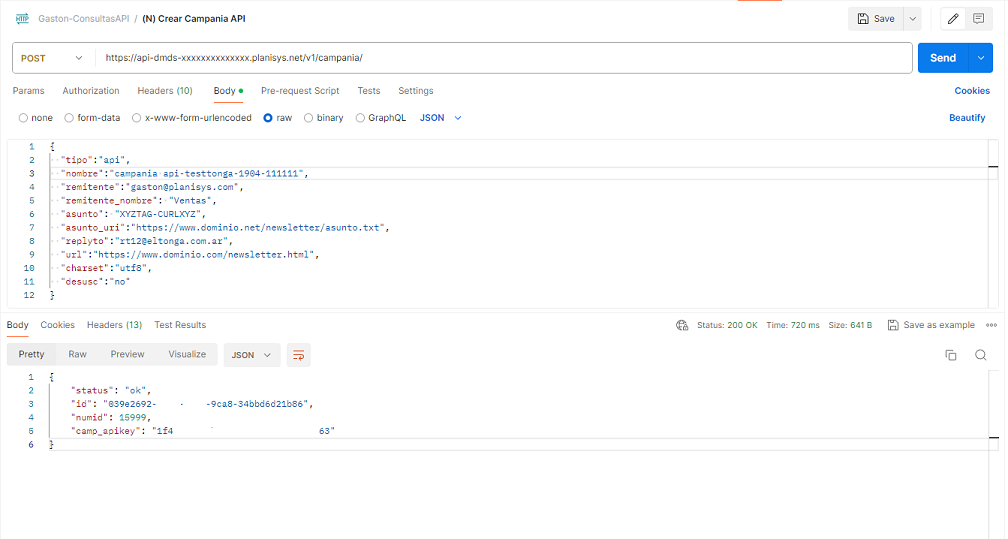
Create a Campaign

With the /v1/campania/ method in POST mode, an api or normal type campaign can be created

The creation always returns the id and the numid, plus an apikey in the case of API, which can be used in subsequent calls, e.g., to send an email.

By obtaining an apikey, SMTP-API can also be used with a username dmdsid-campnumid, and apikey as the key, for applications that require configuring SMTP with authentication, giving the possibility of assigning a username/password pair to a specific campaign.

To create a normal one, you must then go to the web interface and complete the creation of the send

../_images/api18.5.png

The api type campaign requires more parameters, of which only replyto is optional, creating a single send and allowing emails to be sent under the returned numid, e.g.:

../_images/api18.png

If the subject contains XYZTAG-CURLXYZ, then the method requires the asunto_uri parameter because it will be a dynamic subject. If preferred, a fixed static subject can be used, and asunto_uri can be omitted.

Both the sender and the subject and the URL of the mail piece are defaults, meaning they can be overridden when sending emails under the campaign numid.

The call returns a JSON containing a numid for subsequent calls, e.g.

{"status":"ok","id":"66bfae5b-3b6f-4bc9-a563-f62d5a9812a3","numid":68235,"camp_apikey":"a62d247c345fe31d0cda39ba1c3d3501"}

Warning

It is currently not allowed to modify the created campaign, considering that methods like send_one_inline and send_one_uri override the campaign defaults.

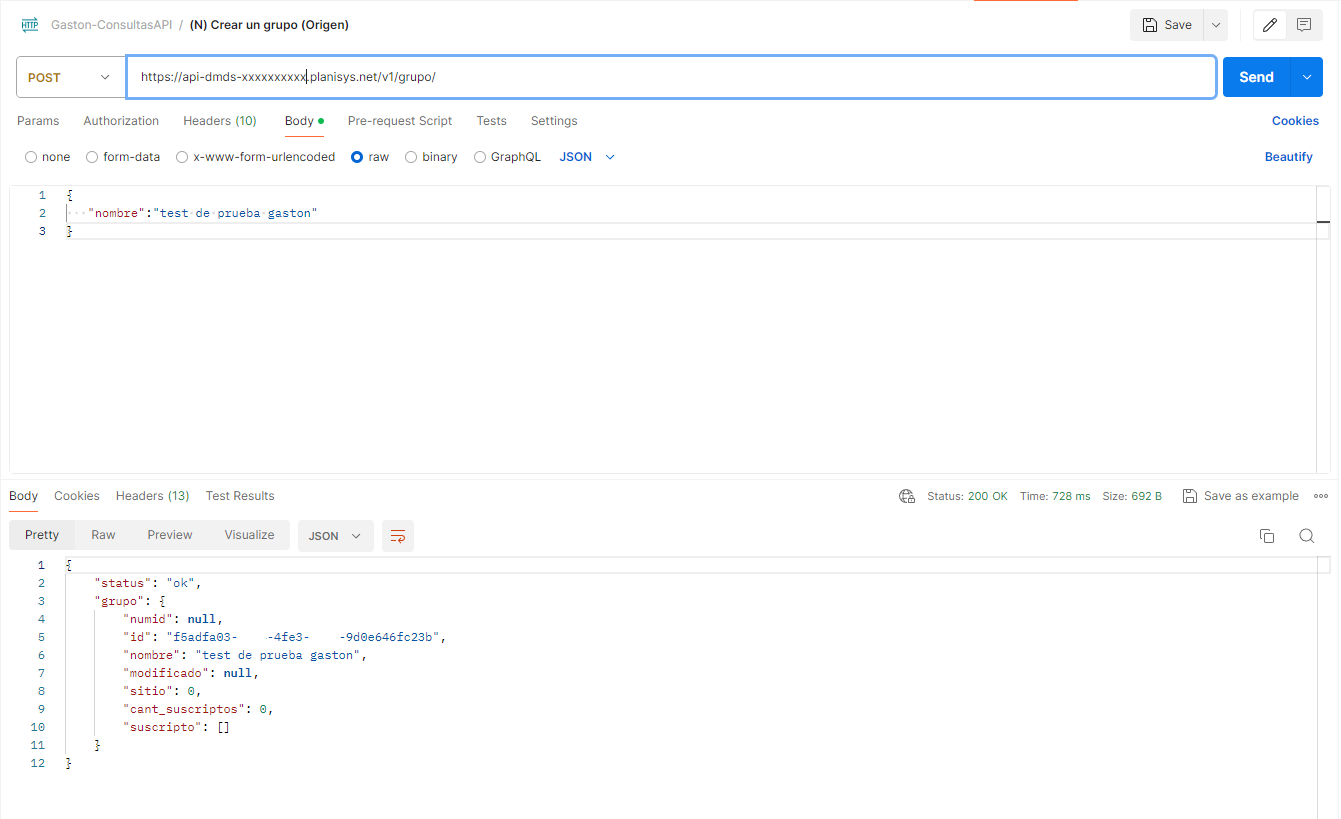
Create a group

As we have seen earlier, when creating or modifying a contact, we can assign them a group (also known as a base). To assign a group, we must check if this group exists. If it does not, we can create it in the following way.

../_images/api28.png

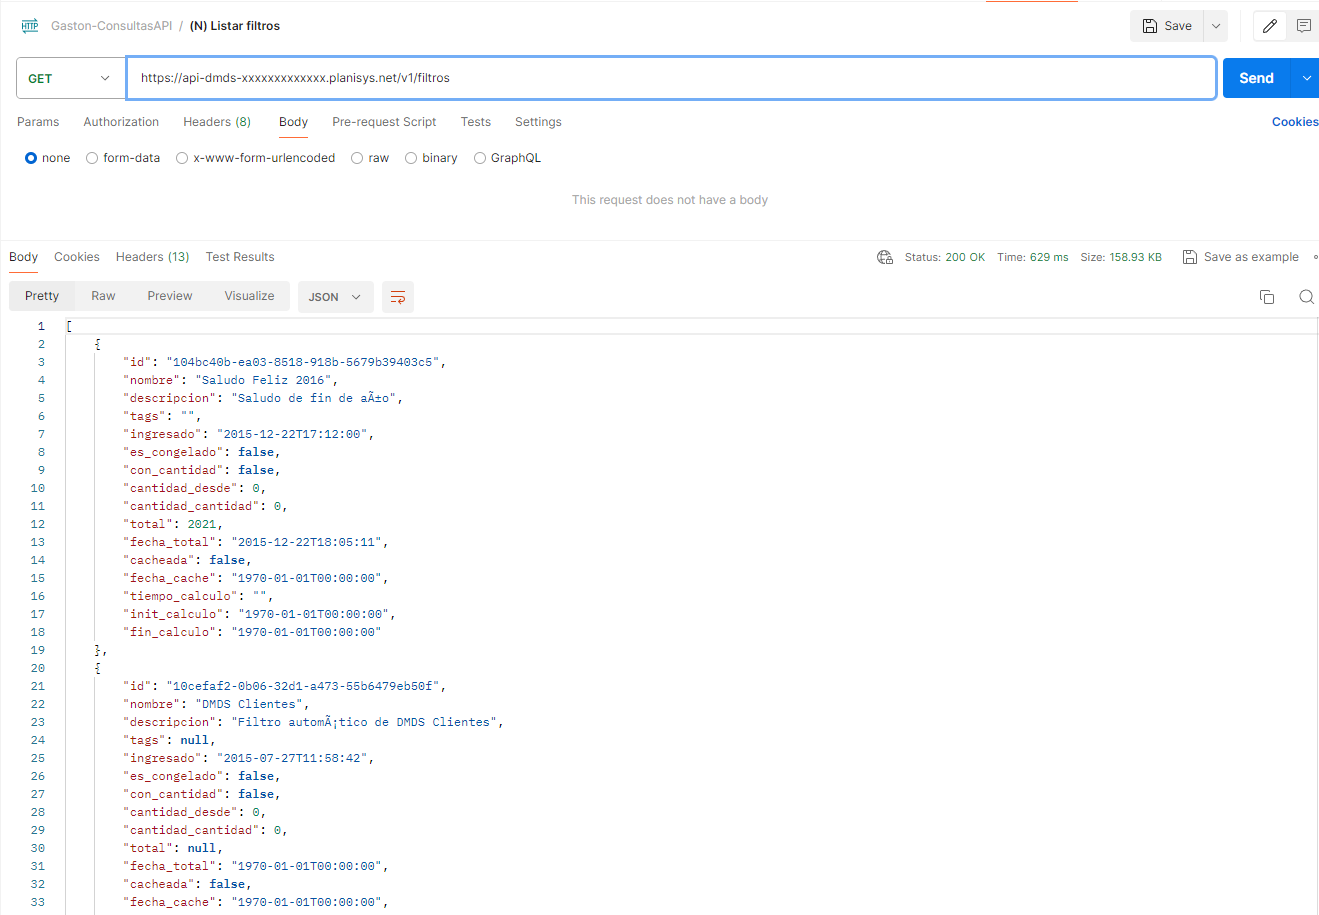
List filters

In the API system, different filters can be created to help specify sends.

To see this list of existing filters, we follow the code mentioned below.

../_images/api29.png

List global variables and their values
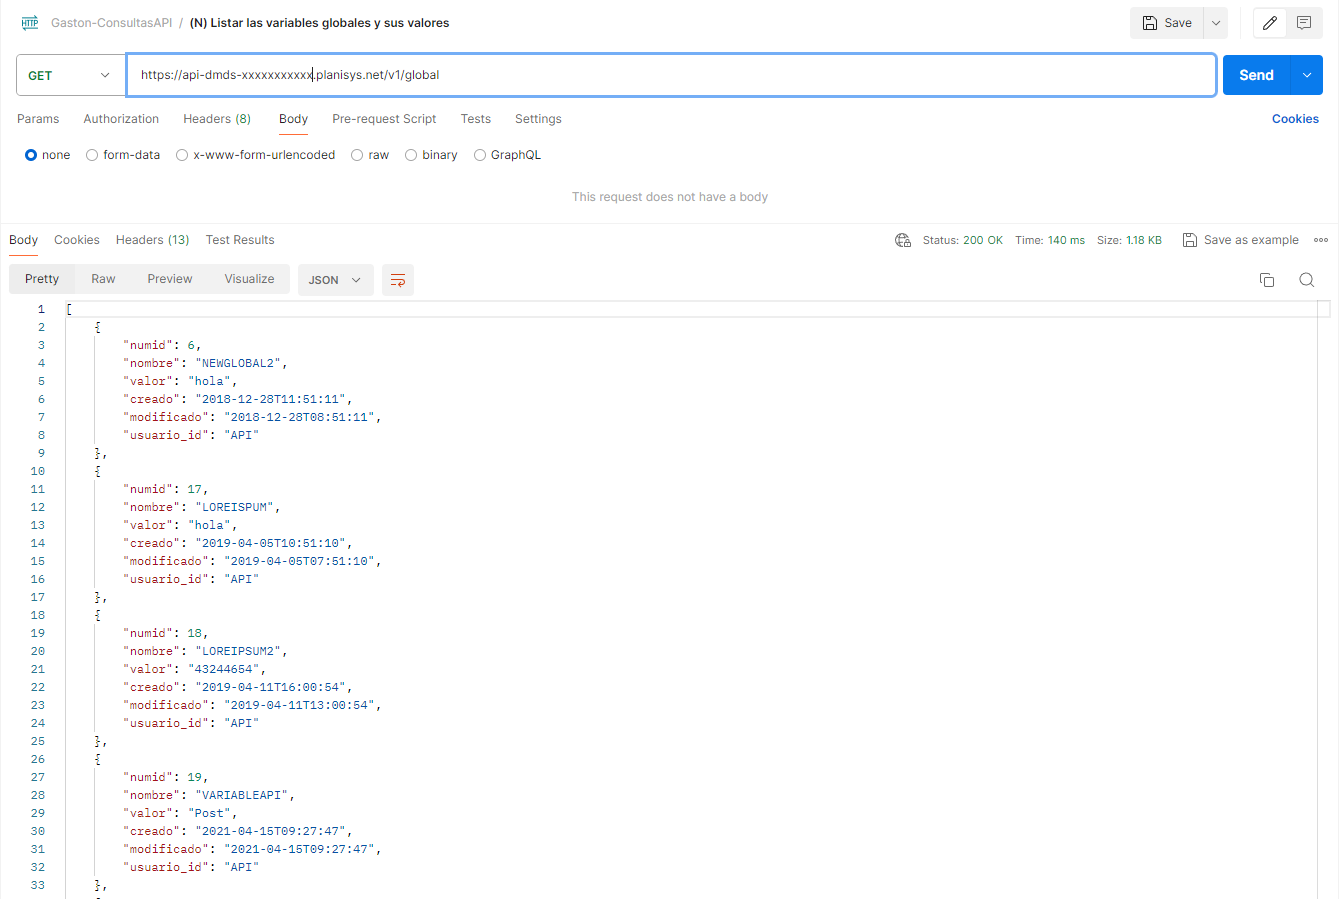
In the API, there are a series of global variables defined. To see what these variables are and their values, we can look at the following code.

../_images/api30.png

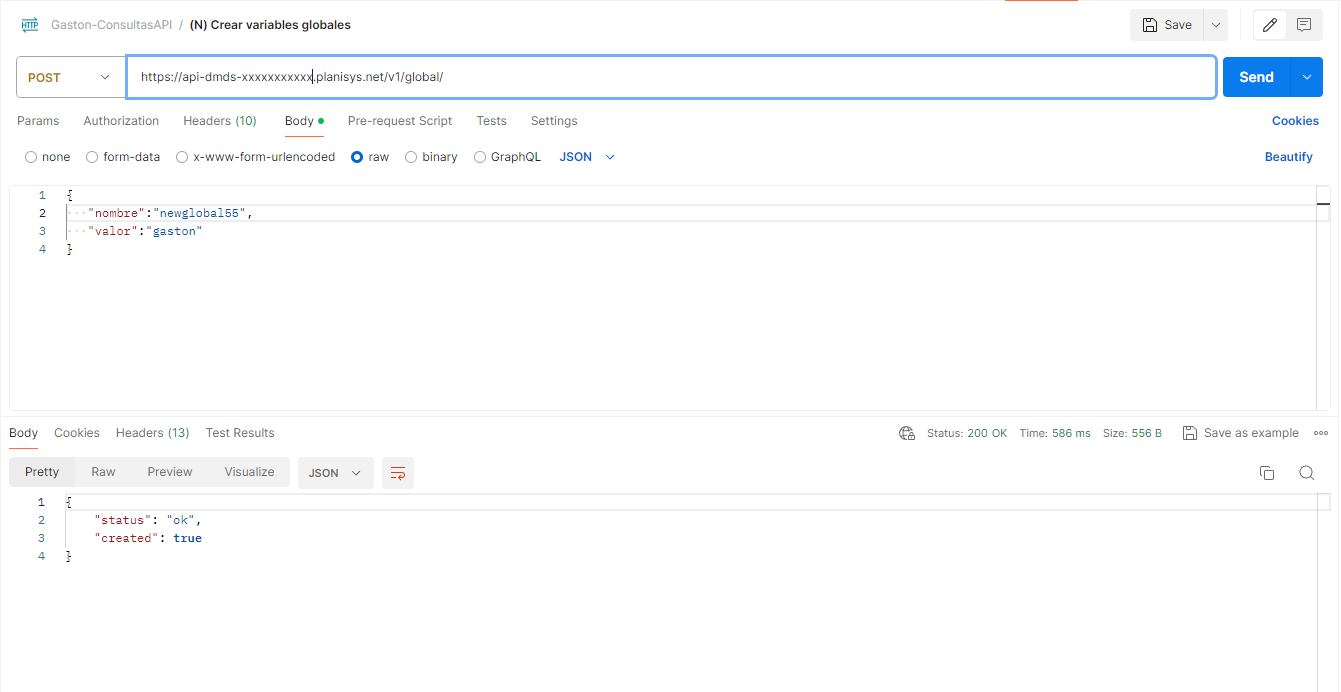
Create global variables

We can always create global variables. For the creation, we will use the POST method, where we pass a variable, which will indicate the name of the global variable.

../_images/api31.png

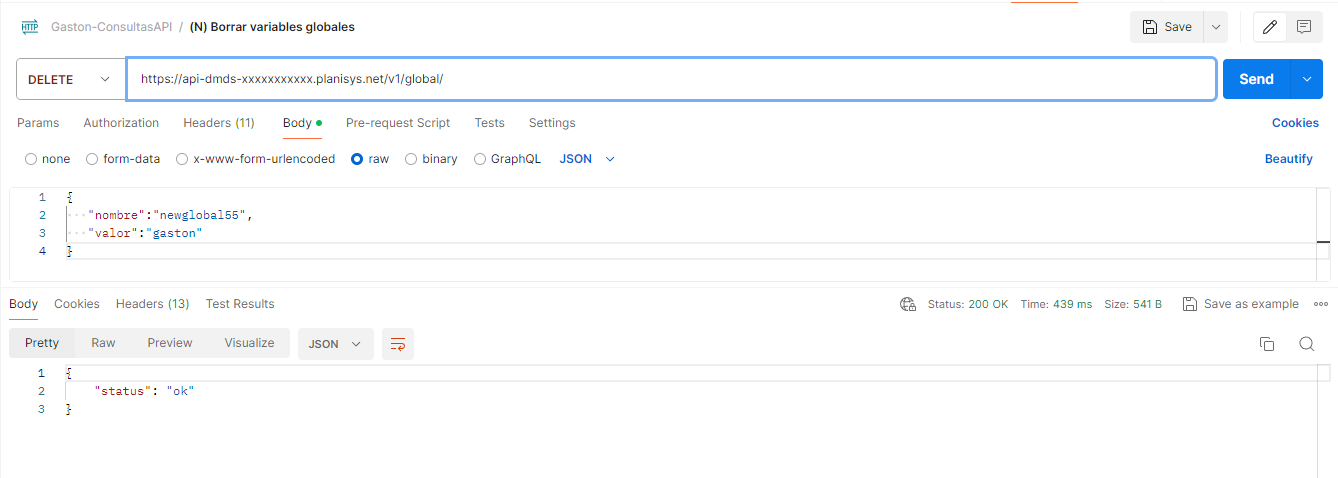
Delete global variables

Just as we created global variables, we can delete them. Only in this case, we will use a method called DELETE

../_images/api32.png

Use of Reply-To, Cc, and Bcc

In the send_one_inline and send_one_uri calls, they can be added within the main JSON:

Reply-To:

{"reply-to": "usuario@dominio.com"}

Note

The reply-to is a single item, and a name that hides the email address is not used for security and transparency reasons.

Cc:

{ "copia":[{ "cc_email":"usuario1@gmail.com", "cc_nombre":"Usuario1", "cc_apellido": "Apellido1"}] }

Note

in the case of a copy, a list of possible copy recipients goes between []. Only the cc_email is mandatory.

If you want to send a blind copy, you should add:

{ "copia_oculta": [ { "bcc_email":"usuario5@gmail.com"}, {"bcc_email:"usuario7@outlook.com"} ] }

JSON Response Messages

Although the response code is not seen at the CURL level, in programming languages when you want to check the response, you should check

  • HTTP Code 200 - OK

  • HTTP Code 403 - Forbidden (usually wrong APIKEY)

  • HTTP Code 4xx - Data errors, such as missing a parameter in the input JSON, like incorrect addresses

It should be noted that in the send_one_inline and send_one_uri calls, as well as in the introduction of a new contact, an email address validity check is performed.

Examples:

In this case, the validity of an Internet domain’s syntax is checked

curl -X POST 'https://api-dmds-dmdsid.planisys.net/v1/contacto/' --header 'accept: application/json' --header 'Authorization: 11111111111113243433' --header 'Content-Type: application/json' --data '{"email": "ifdjsahfjdsaf@gmail"}'

Returns

{"status":"err","on":"invalid email The domain name gmail is not valid. It should have a period."}

In this case, it checks that there is only one @ in each email address

curl -X POST 'https://api-dmds-dmdsid.planisys.net/v1/contacto/' --header 'accept: application/json' --header 'Authorization: 11111111111113243433' --header 'Content-Type: application/json' --data '{"email": "@-@gmail"}'

Returns

{"status":"err","on":"invalid email The email address is not valid. It must have exactly one @-sign."}

This is a case of international characters not allowed in email addresses

curl -X POST 'https://api-dmds-dmdsid.planisys.net/v1/contacto/' --header 'accept: application/json' --header 'Authorization: 11111111111113243433' --header 'Content-Type: application/json' --data '{"email": "josépérez@gmail.com"}'

Returns

{"status":"err","on":"invalid email Internationalized characters before the @-sign are not supported."}

This is a case of a non-existent domain

curl -X POST 'https://api-dmds-dmdsid.planisys.net/v1/contacto/' --header 'accept: application/json' --header 'Authorization: 11111111111113243433' --header 'Content-Type: application/json' --data '{"email": "juanperez@gmail.com", "remitente":"jose@escuelaxyz.com", "remitente_nombre":"PLANICóRP"}'

Returns

{"status":"err","on":"remitente invalido The domain name escuelaxyz.com does not exist."}

In this case, the sender domain is not declared on the DMDS web, meaning it is not a permitted domain for this particular DMDS:

curl -X POST 'https://api-dmds-dmdsid.planisys.net/v1/contacto/' --header 'accept: application/json' --header 'Authorization: 11111111111113243433' --header 'Content-Type: application/json' --data '{"email": "juanperez@gmail.com", "remitente":"jose@gmail.com", "remitente_nombre":"PLANICóRP"}'

Returns

{"status":"err","on":"dominio remitente no permitido"}

Use of Sender and Return-Path

The permitted domains to be used as senders are listed on the DMDS web.

In the previous example, it was seen that the REST API v1 rejects the sender as not allowed because the domain to the right of the @ is not listed.

What should be noted is that on the DMDS Web, for each permitted domain, an appropriate return-path for bounce reading is listed. E.g., if the sender domain is dom1.com, we will probably have dmds-dom1@nl.dom1.com as the Return-Path address different from the From: header which will be, for example, usuario@dom1.com.

These data are registered in the DMDS provisioning and can be changed as domains are added or removed.

The goal of the Return-Path being a subdomain of the main domain is through the DMARC record to have a valid Return-Path that serves to direct bounces to a mailbox that the DMDS can automatically process.

Last Updated on 2024-08-21