PHP Configuration in ISPConfig
When PHP support is enabled for a website in ISPConfig, the option “Custom php.ini settings” is activated in the “Options” tab. This allows you to directly modify specific parameters of the PHP configuration file for that website. For example:
Modifying PHP Parameters
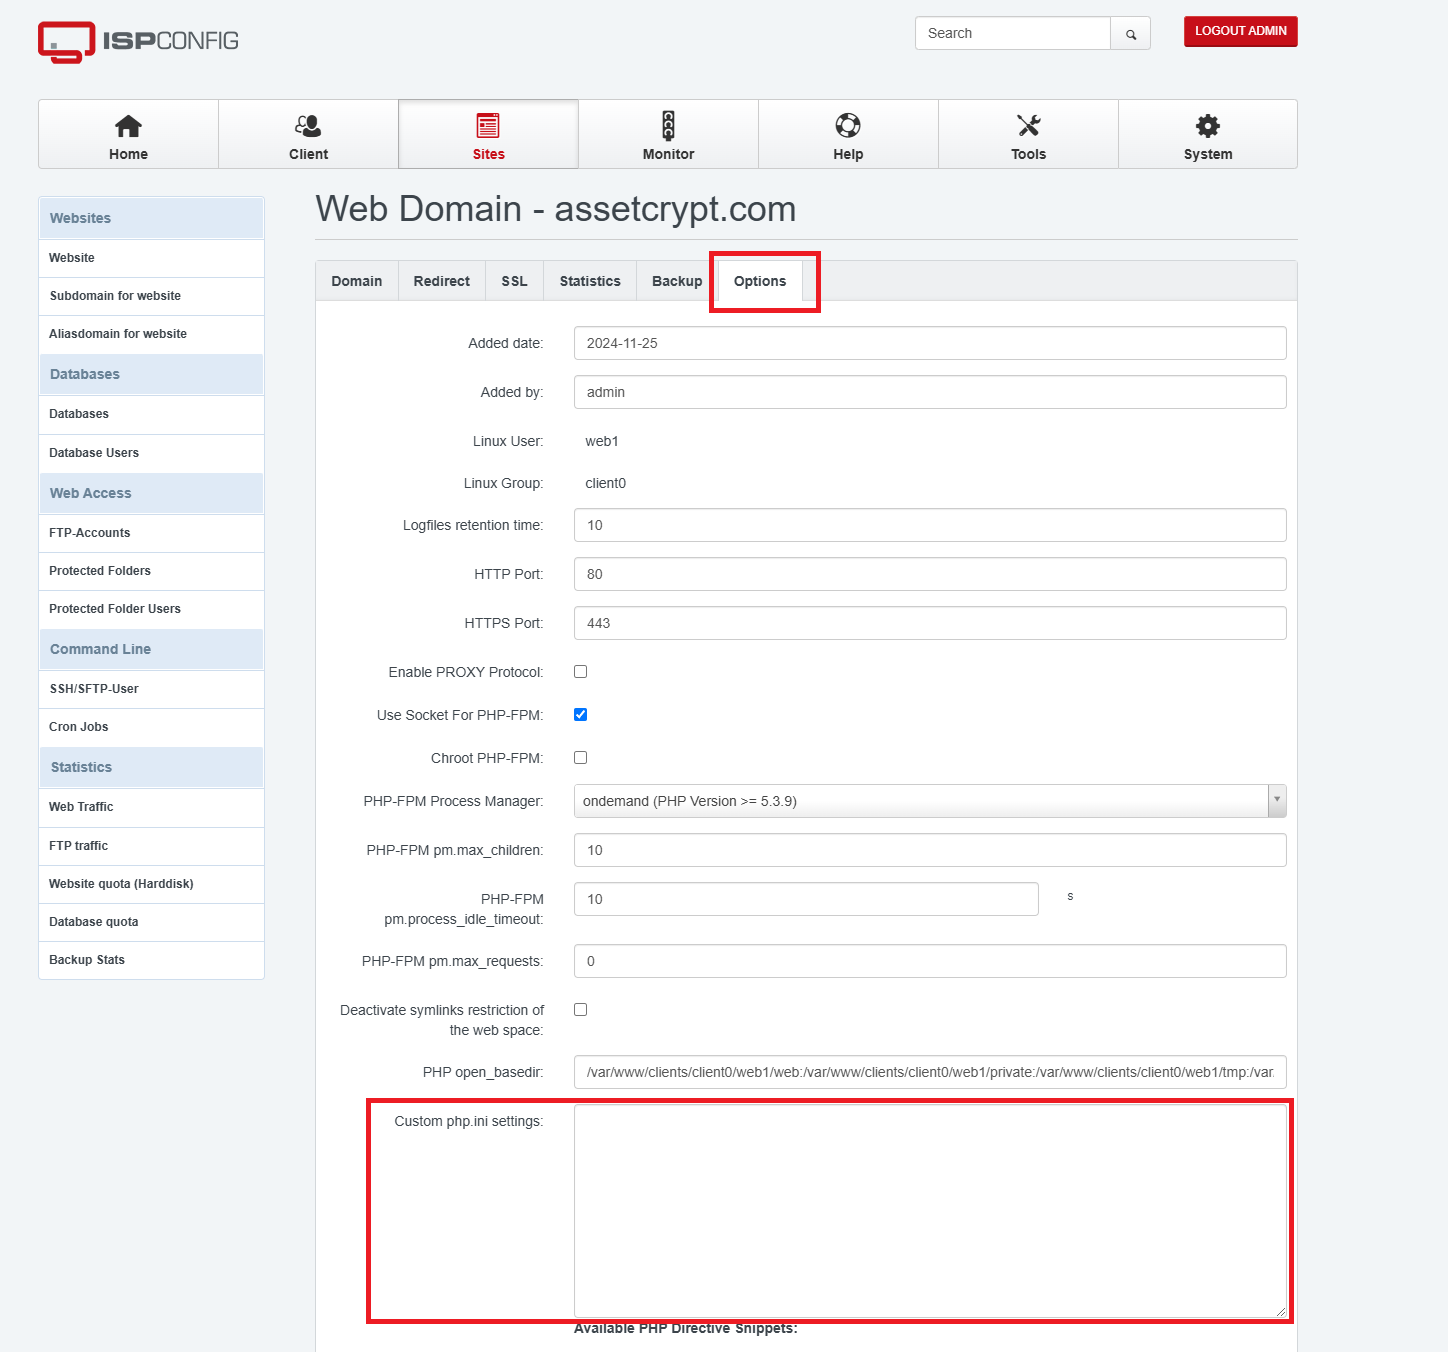
Access the ISPConfig panel and select the desired website.
Go to the Options tab.
In the Custom php.ini settings field, you can add specific configurations for your site. Example:
memory_limit = 256M
post_max_size = 64M
upload_max_filesize = 64M
Save the changes to apply them immediately.
Description of Parameters
memory_limit: Defines the maximum amount of memory a PHP script can use.
post_max_size: Specifies the maximum allowed size for data sent via the POST method.
upload_max_filesize: Sets the maximum allowed size for file uploads.
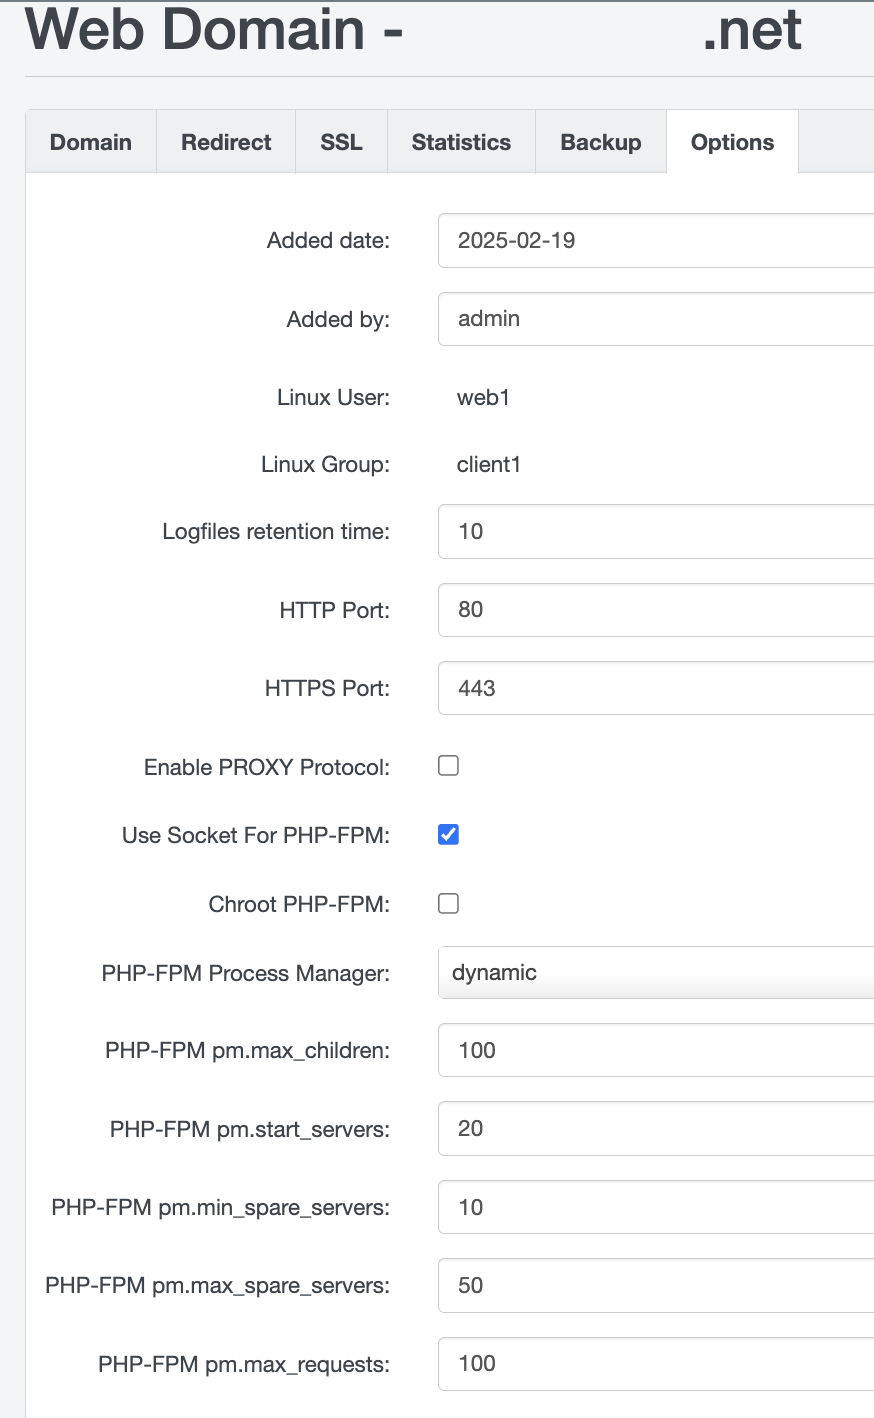
Recomendaciones para sitios en produccion
Para sitios que cuentan con una razonable cantidad de visitas, es decir… No es un sitio de testing. Se recomienda incrementar los valores que vienen por defecto para PHP-FPM
Warning
Recuerden que este tipo de configuraciones deben ser realizadas acorde a las necesidades de cada uno.
El siguiente es un ejemplo de opciones que puden utilizar:
Advanced PHP Parameters
The following are advanced PHP configurations that you can use in “Custom php.ini settings”.
Execution Time and Memory
max_execution_time = 120
max_input_time = 60
File Uploads
post_max_size = 64M
Errors and Logs
error_reporting = E_ERROR
display_errors = Off
log_errors = On
Timezone Configuration
date.timezone = "America/Argentina/Buenos_Aires"
1. Execution Time and Memory
max_execution_time This parameter defines the maximum time, in seconds, that a PHP script can run before being stopped by the server. Recommended value: max_execution_time = 120 Common use: Increasing this limit is useful for heavy scripts, such as import/export processes or report generation.
max_input_time Specifies the maximum time allowed for PHP to process input data (POST, GET, etc.). Recommended value: max_input_time = 60 Common use: Set it according to the needs of long forms or upload requests.
2. File Uploads
post_max_size Defines the maximum size of data sent via an HTTP POST form, including files and text. Recommended value: post_max_size = 64M Common use: This value should be equal to or greater than upload_max_filesize to avoid errors when uploading large files.
3. Errors and Logs
error_reporting Configures the PHP error reporting level. Recommended value for production: error_reporting = E_ERROR Common use: In production, limiting errors to E_ERROR prevents displaying warnings or unnecessary notifications.
display_errors Controls whether errors are displayed directly on the standard output. Recommended value for production: display_errors = Off Common use: Disable it in production environments to avoid exposing sensitive information. Keep it enabled in development to facilitate debugging.
log_errors Enables error logging to a log file. Recommended value: log_errors = On Common use: It is useful for tracking issues on the server without displaying errors directly on the page.
4. Timezone Configuration
date.timezone Sets the default timezone for PHP date and time functions. This prevents warnings related to undefined timezone settings. Example for Argentina: date.timezone = “America/Argentina/Buenos_Aires” Common use: Ensure it is configured to match the server’s location or the primary region of the target audience.
Opciones de Seguridad
Estas opciones están orientadas a reforzar la seguridad en entornos de producción:
disable_functions La directiva disable_functions en el archivo php.ini permite deshabilitar funciones que pueden ser potencialmente peligrosas si se usan de forma indebida. Al establecer:
disable_functions = exec, passthru, shell_exec, system, proc_open, popen, pcntl_exec
Con esta opcion se evita que cualquier script PHP pueda ejecutar comandos del sistema, lo que mitiga riesgos como la ejecución de código arbitrario o inyección de comandos.
session.cookie_secure La opción session.cookie_secure = 1 indica que las cookies de sesión solo se enviarán a través de conexiones HTTPS. Esto previene que la información de la sesión sea transmitida por conexiones no cifradas, reduciendo el riesgo de interceptación.
session.cookie_httponly Con session.cookie_httponly = 1, se restringe el acceso a la cookie desde el lado del cliente, es decir, no se podrá acceder a ella mediante scripts (por ejemplo, JavaScript). Esto ayuda a prevenir ataques de tipo Cross-Site Scripting (XSS).
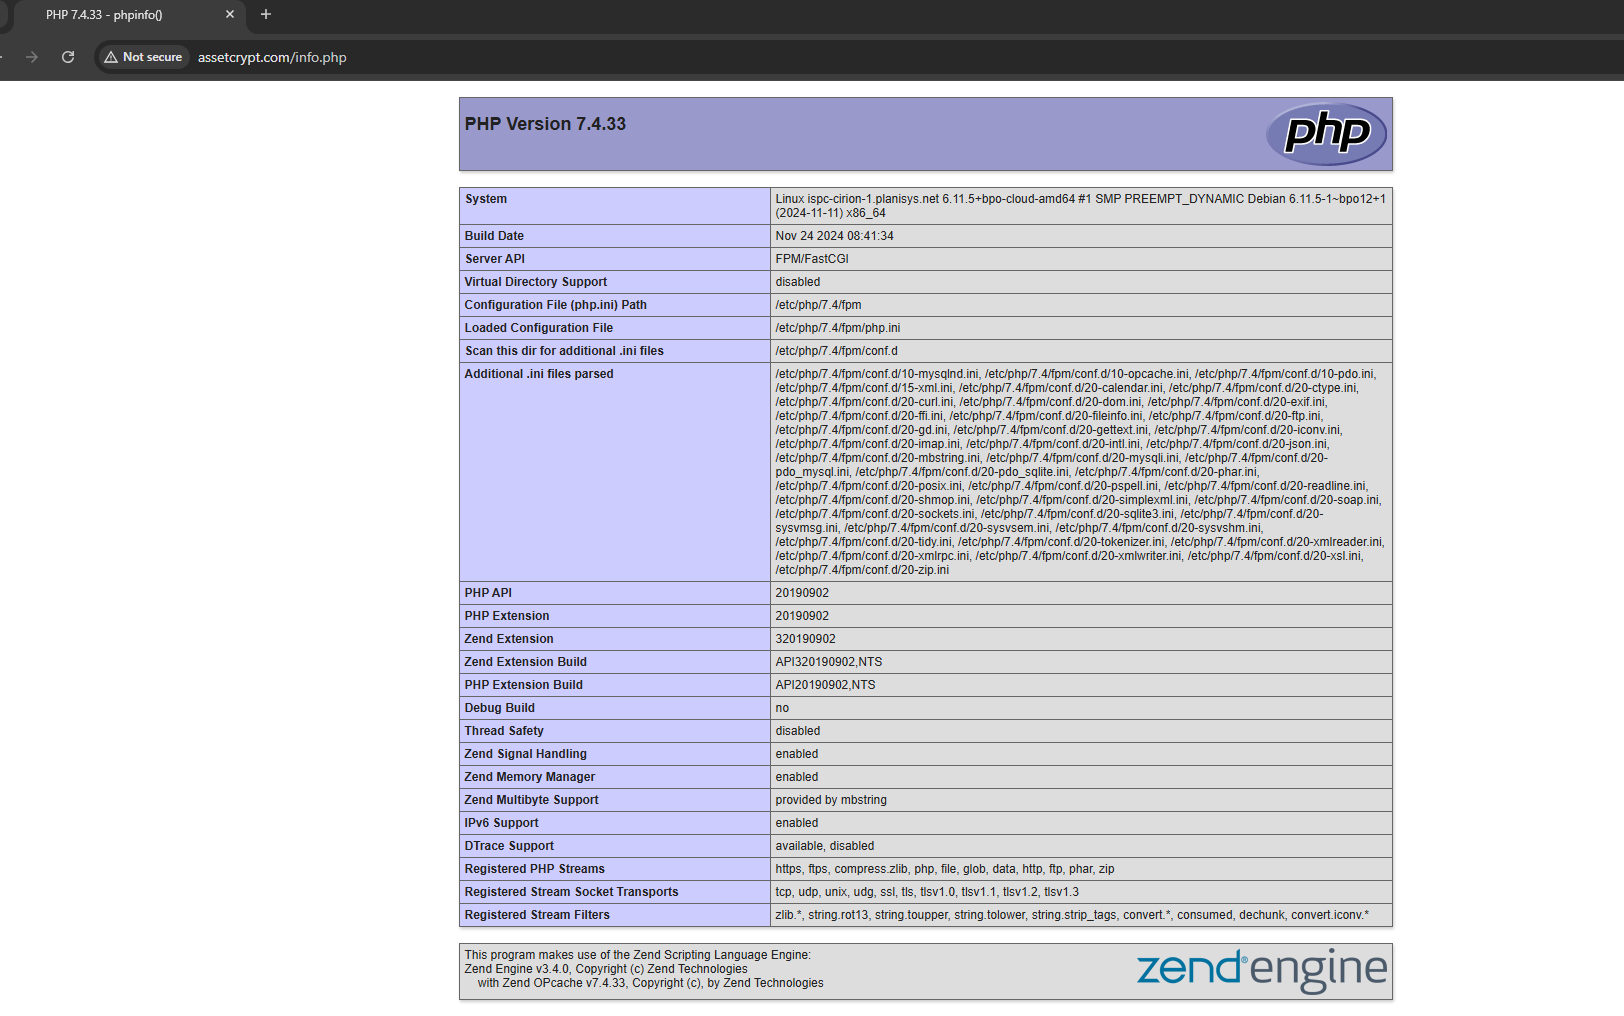
Creating an info.php File with phpinfo()
The info.php file is a useful tool to check the current PHP configuration, including installed modules, resource limits, and configuration values.
Steps to create an info.php file
Connect to the server where the website is hosted using an FTP client or SSH access.
Navigate to the root directory of the website, usually “web/” within the directory assigned to the client in ISPConfig.
Create a file named “info.php” and add the following content:
<?php
phpinfo();
?>
Guarda el archivo.
How to access the info.php file
Open a web browser and visit the corresponding URL. For example: https://example.com/info.php
You should see a detailed page with all the information about the current PHP configuration.
Take a screenshot of the current configuration
Open the info.php file in your browser.
Press the “Print Screen” key or use a screenshot tool to save an image of the current configuration.
Save the image as a PNG or JPG file and make sure to include it in the manual.
Recommendation: Security for the info.php file
For security reasons, delete the “info.php” file after verifying the PHP configuration. Leaving this file accessible could expose sensitive server information, such as file paths or installed modules, to potential attackers.